
Deploy Galleries on your Store
Curalate Pixel is not GDPR, CNIL, and CCPA compliant. You assume all risks associated with personally identifiable information (PII) in the regions that you operate.Bazaarvoice Social Commerce no longer supports new Curalate Pixel (crl8.pixel) instances as of 2021. If you deployed Galleries on your site before this date, you can continue to use this documentation. We highly recommend that you Connect Google Analytics or Adobe Analytics to avoid data loss in the future when Curalate Pixel is deprecated.
Overview
Social Commerce provides an easy way to integrate your shoppable content Galleries on standard storefront pages like: Homepage, PDP, Category page, and custom Gallery pages.
This guide will walk you through 3 steps:
- Install the Social Commerce script tag.
- Insert HTML on the pages where you want to display your Galleries.
- Setup eCommerce tracking events to enable better recommendations in Showroom and Like2Buy and enable insights within Social Commerce.
If you want more information on setting up Galleries in the Social Commerce App, visit this guide.
If you're not using Galleries and are just looking to setup eCommerce tracking events, skip step 2.
Install Social Commerce script tag
In order to integrate Social Commerce so that your experiences and analytics work across your site, it's recommended that you install the Social Commerce script tag on all pages by placing it in the <head> of your site layout. The Social Commerce script tag will not change the look or feel of your website. It will asynchronously load additional javascript as needed so that it doesn't impact the initial page load time of your site pages.
Copy the snippet below. Replace YOUR_SITENAME with your Social Commerce site name, which can be found in the Social Commerce app by clicking on Embed Gallery in the upper right corner of your Galleries Dashboard.
<script>
!(function (siteName) {
  var e = window.crl8 = window.crl8 || {}, n = !1, i = [];
  e.ready = function (e) { n ? e() : i.push(e) },
  e.pixel = e.pixel || function () { e.pixel.q.push(arguments) },
  e.pixel.q = e.pixel.q || [];
  var t = window.document, o = t.createElement("script"),
  c = e.debug || -1 !== t.location.search.indexOf("crl8-debug=true") ? "js" : "min.js";
  o.async = !0,
  o.src = t.location.protocol + "//edge.curalate.com/sites/" + siteName + "/site/latest/site." + c,
  o.onload = function () { n = !0, i.forEach(function (e) { e() }) };
  var r = t.getElementsByTagName("script")[0];
  r.parentNode.insertBefore(o, r.nextSibling)
})('YOUR_SITENAME');
</script>
For example, if your site name is Habiliment-RUQGBj then you would use the following CRL8_SITENAME. Make sure to enclose with quotes:
<script>
!(function (siteName) {
  var e = window.crl8 = window.crl8 || {}, n = !1, i = [];
  e.ready = function (e) { n ? e() : i.push(e) },
  e.pixel = e.pixel || function () { e.pixel.q.push(arguments) },
  e.pixel.q = e.pixel.q || [];
  var t = window.document, o = t.createElement("script"),
  c = e.debug || -1 !== t.location.search.indexOf("crl8-debug=true") ? "js" : "min.js";
  o.async = !0,
  o.src = t.location.protocol + "//edge.curalate.com/sites/" + siteName + "/site/latest/site." + c,
  o.onload = function () { n = !0, i.forEach(function (e) { e() }) };
  var r = t.getElementsByTagName("script")[0];
  r.parentNode.insertBefore(o, r.nextSibling)
})('Habiliment-RUQGBj');
</script>
Insert HTML on Galleries Pages
For each experience, you want to activate (Homepage, Category, PDP, Gallery page), you’ll need to place an HTML tag on the corresponding page. These tags should be placed on the page in the layout based on where you want the experience to show up. The code you'll need to copy into your site for each of the different experiences is below. Feel free to add any additional HTML elements like a header above or below your Gallery.
Each experience needs to be configured in the Social Commerce application or by your Solutions representative. If you insert the HTML and do not see the experience load it's likely that either:
- The Social Commerce script tag is missing.
- The specific experience (Homepage, Category, PDP, Gallery) was not set up within the Social Commerce App.
If your website is running on a single-page application or if you need more control over the initialization of your Galleries, visit our advanced integration guide.
Homepage
To set up the homepage experience, place the following code in the desired place on your homepage layout:
<div data-crl8-container-id="homepage"></div>Product Detail Page (PDP)
To set up the product page experience, copy the following code to your PDP page layout and replace PRODUCT_ID with the product identifier from the PDP context.
<div data-crl8-container-id="product" data-crl8-filter="productId:'PRODUCT_ID'"></div>The product identifier can be any identifier from your product catalog. If your PDPs group several variants, it should ideally match the product group that the PDP represents instead of individual SKUs. For more information on product catalogs and identifiers, see Catalog Setup.
Category
To setup the category experience, copy the following code to your category page layout and replace PARENT_CATEGORY > CATEGORY with a value corresponding to the category page. Enclose the category value with single quotes.
<div data-crl8-container-id= "category"
data-crl8-filter="category:'PARENT_CATEGORY > CATEGORY'"></div>
Other Galleries
To setup the gallery experience, place the following code on your custom gallery page layout:
<div data-crl8-container-id="YOUR_GALLERY_ID"></div>Advanced Filtering
You can filter the contents of any given Fanreel to better suit the needs of a certain site page by filtering content based on category, label, locale, etc. All you need to do is insert certain parameters in the JS Initialization.
Labels
- During moderation, you can tag any Social Commerce content with your own labels to segment content for different pages or for a specific campaign.
- The snippet below will only show UGC that is tagged with “homepage”. This can be used to selectively allow you to curate the content that your clients will see on your homepage.
<div data-crl8-container-id="homepage" data-crl8-filter="label:homepage"></div>- General Snippet:
<div data-crl8-container-id="homepage" data-crl8-filter="label:PUT_LABEL_HERE"></div>Hashtags
- Hashtags in the UGC description can be used to filter the content you want in a specific Fanreel.
- The snippet below will only show UGC that is tagged with “#shoestyle”. This can be used to selectively allow you to curate the content that your clients will see on your Fanreel.
<div data-crl8-container-id="campaign" data-crl8-filter="tag:shoestyle"></div>- General Snippet
<div data-crl8-container-id="campaign" data-crl8-filter="tag:PUT_TAG_HERE"></div>Locale
- The product information displayed in the Fanreel can be adjusted for its location.
- These values (international links, foreign currencies, etc.) will be pulled from information included in your localized product catalog. Learn more about catalog localization requirements
- Locale must be formatted xx-XX, where the country code is capitalized.
- In the example below, an en-US catalog and de-DE catalog were provided and processed.
This experience will show the German product catalog information:
<div data-crl8-container-id="homepage" data-crl8-locale="de-DE"></div>This experience will show the American English product catalog information:
<div data-crl8-container-id="homepage" data-crl8-locale="en-US"></div>Lazy Loading Galleries
To improve performance, Social Commerce Galleries can be lazy loaded on your site*. Lazy loading reduces Social Commerce’s impact on your site’s page load time. With lazy loading enabled, the Galleries are intelligently loaded only when they are ready to be used (just before entering the viewport).
To make use of the lazy loading feature, add the data-crl8-lazy-load-experience attribute to the Gallery container on your site.
<div data-crl8-container-id="homepage" data-crl8-lazy-load-experience="true"></div>
It is not recommended to use lazy loading if the Social Commerce Gallery is the primary content on the page (ex: full page gallery). Lazy loading is better used for Galleries that sit below the fold and are not needed to display on initial page load.
Setup eCommerce Tracking
Ecommerce Tracking enables site Conversion, AOV, and Revenue based insights for your Gallery within the Social Commerce App. If you connect Google Analytics in the Social Commerce Web App, then you're already set up.
If you don't use Google Analytics, follow the following steps to enable these insights.
Checkout (PURCHASE)
This event captures purchase data, so Social Commerce can provide revenue analytics associated with your content within Galleries and other Social Commerce touchpoints.
Typically after purchase, your customers will be directed to a 'Checkout Confirmation Page' and this is where you'll use the following functions on the crl8 object to relay the purchase data:
- addTransactionInfo
- addProduct
- send
To add transaction data, use the addTransactionInfo function.
crl8.pixel('addTransactionInfo', {
	'transactionId': '12019271367',
	'userId': '678910',
	'cartValue': '100.00',
	'taxValue': '10.00',
	'shippingValue': '0.00',
	'shippingCity': 'Seattle',
	'shippingCountry': 'USA',
	'currency': 'USD'
});
Add individual product information within a transaction using the addProduct function. Make sure to add all required fields and do this for every item in the purchased shopping cart.
crl8.pixel('addProduct', {
	'productId': '11111',
	'productName': 'blue jeans',
	'price': '5.99',
	'displayPrice': '10.87',
	'quantity': '2',
	'sku': '128918',
	'category': 'pants'
});
Once the transaction and product data have been recorded, use the send command to send the data to Social Commerce. Without calling the second command, the purchase will not be recorded with Social Commerce.
crl8.pixel('send');eCommerce Tracking Data Types
Each tracking event uses Product Item data. The checkout event requires additional Transaction data.
Product Item Data
An item represents the individual products that were viewed or in the shopping cart, and contains the following values:
| Key | Required | Type | Description |
|---|---|---|---|
| productId | yes | string | Should match productId used for PDP Gallery integration if applicable e.g. "1234 " |
| productName | yes | string | Name of product e.g. "Boyfriend Jeans " |
| quantity | yes | number | Number of units purchased in transaction e.g. 1 |
| price | yes | number | Actual price paid for the item after discounts e.g. 64.99 |
| displayPrice | no | number | Listed price before any discounts e.g. 81.99 |
| sku | no | string | Internal SKU e.g. "12918abc " |
| category | no | string | Category of product e.g. "Clothing " |
| userId | no | string | Unique identifier for the user e.g. "123abc " |
| currency | no | string | Should be a 3 character ISO 4217 code, e.g. "USD " or "GBP " |
Transaction Data
A transaction represents the entire transaction that occurs on your site, and contains the following values:
| Key | Required | Type | Description |
|---|---|---|---|
| transactionId | yes | string | Your own unique id for this transaction, e.g. "1234" |
| userId | no | string | Unique identifier for the user e.g. "123abc" |
| cartValue | no | number | Total value of cart before tax, e.g. 45.99 |
| taxValue | no | number | Total tax for the transaction, e.g. 3.45 |
| shippingValue | no | number | Total shipping cost of the transaction, e.g. 8.00 |
| shippingCity | no | string | Shipping city, e.g. "Seattle" |
| shippingState | no | string | Shipping state, e.g. "Washington" |
| shippingCountry | no | string | Shipping Country, e.g. "USA" |
| currency | no | string | Should be a 3 character ISO 4217 code, e.g. "USD" or "GBP" |
Setup with Tag Manager
The Social Commerce script tag and the eCommerce Tracking events can be configured with tag management systems (Google Tag Manager, Adobe Dynamic Tag Management, etc). This section covers how it can be set up using Google Tag Manager (GTM) via Custom HTML Tags.
Before proceeding, please note that 3rd party ad blockers that utilize EasyList EasyPrivacy (e.g. uBlock Origin) currently block Google Tag Manager gtm.js. Any visitors with these ad blockers enabled will be unable to view content served up via gtm.js, including but not limited to your Galleries. To avoid this, you can use our standard integration as described above.
This section only includes guidance on configuring the JavaScript portions of the integration which can be accomplished with tag managers. To enable Galleries on pages you will still need to place additional HTML tags as covered in the Insert HTML on Galleries Pages section.
There are two high-level steps:
- Configure a tag for the Social Commerce script tag to run on any page where you expect to display a Gallery or where you'll be emitting eCommerce Tracking events like the checkout page.
- Configure separate tags for firing the product view and checkout events. With this approach, you’ll need to leverage your data layer for passing product and transaction information into the Social Commerce JavaScript snippets.
TAG MANAGER - INSTALL SOCIAL COMMERCE SCRIPT TAG
Create a new Custom HTML Tag and paste in the tracking code snippet from the top of this guide. Replace YOUR_SITENAME with your Social Commerce site name, which can be found in the Social Commerce App.

This tag should run only once per page, which can be configured in Advanced Settings.
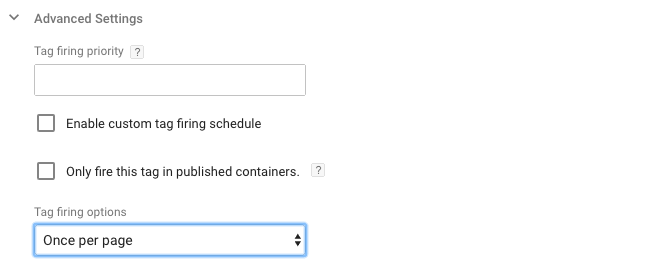
Ensure it runs on all pages or, at a minimum, it should run on all pages with Galleries experiences, product detail pages, and the order confirmation page.

Tag Manager (PURCHASE) Event
Assuming your site is using the Google Standard Ecommerce data layer setup like:
<script>
window.dataLayer = window.dataLayer || []
dataLayer.push({
	'transactionId': '1234',
	'transactionAffiliation': 'Acme Clothing',
	'transactionTotal': 38.26,
	'transactionTax': 1.29,
	'transactionShipping': 5,
	'transactionProducts': [{
                'id': 'DD44',
		'sku': 'DD44',
		'name': 'T-Shirt',
		'category': 'Apparel',
		'price': 11.99,
		'quantity': 1
	},{
                'id': 'AA1243544',
		'sku': 'AA1243544',
		'name': 'Socks',
		'category': 'Apparel',
		'price': 9.99,
		'quantity': 2
	}]
});
</script>
Create a new Custom HTML Tag and copy paste the snippet below.
<script>
	var products = {{transactionProducts}};

	crl8.pixel('addTransactionInfo', {
		'transactionId': {{transactionId}},
		'cartValue': {{transactionTotal}},
		'taxValue': {{transactionTax}},
		'shippingValue': {{transactionShipping}},
		'currency': 'USD'
	});

	for (i = 0; i < products.length; i++) {
		crl8.pixel('addProduct', {
			'productId': products[i].id,
			'productName': products[i].name,
			'price': products[i].price,
			'displayPrice': products[i].price,
			'quantity': products[i].quantity,
			'sku': products[i].sku,
			'category': products[i].category
		});
	}

	crl8.pixel('send');
</script>
Configure the tag to trigger on the order confirmation page. To ensure that the Social Commerce Script tag fires before the product view event, specify it as a setup tag in the Tag Sequencing options.
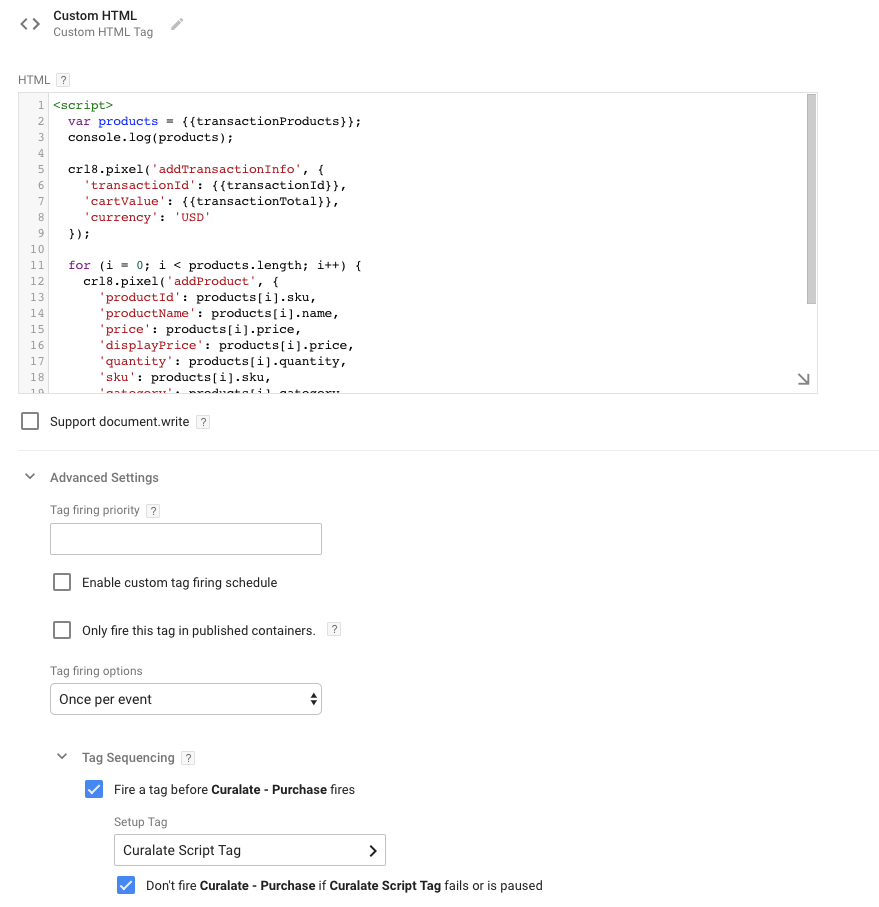
Updated 3 months ago